Wednesday 3 August 2016

How To...Make a Hedgehog Mousse Cake

I find nostalgia is amplified by living on the other side of the world. For some this makes them feel like the grass maybe wasn’t greener and draws them home, for my friends and I this nostalgia effect is evidenced by our desire for food from home. I think I have consumed more Tim Tams and Cherry Ripe's since moving to London then I ever did at home. My obsession with chicken salt has also increased tenfold.

Nostalgia was certainly in play when the Compatriot chose her theme for her recent birthday cake: hedgehog slice.

For the uninitiated this is an iconic Australian childhood treat made with chocolate (or cocoa), broken biscuits and coconut. Nuts sometimes make a guest appearance but are entirely optional. Hedgehog slice is sold in bakeries and found in lunch boxes across the country and is as common to an Australian as a chocolate digestive or custard cream to a Brit.  

While hedgehog slice is delicious, it didn’t quite meet my lofty aspirations in terms of appearance for a birthday cake. I like to lean toward dramatic, if not perfect.  I cobbled together some ideas, rejecting others (no to cheesecake, no to various shapes) and eventually settled on what would become this:


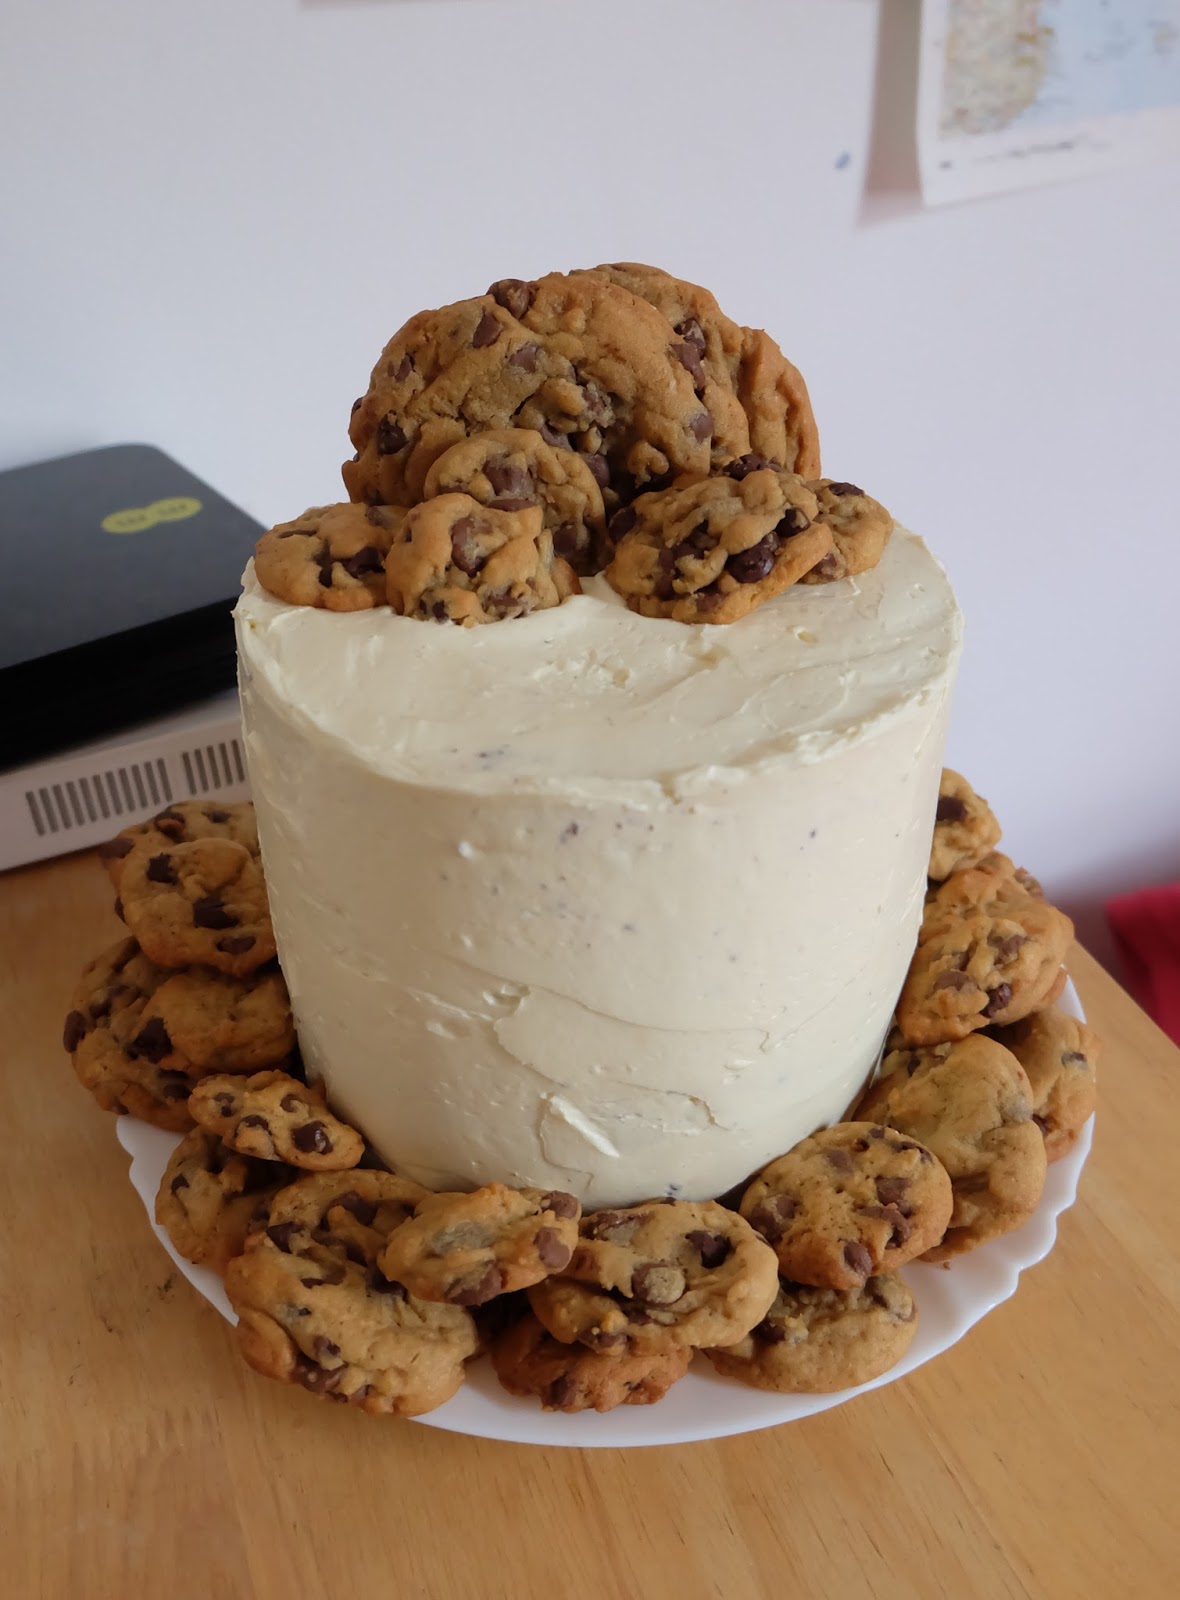
Hedgehog slice, topped with coffee mousse with a Nutella mousse core, chocolate mirror glaze and truffles. 
The Compatriots 28th birthday cake. With its shiny top and domed surface this was a hedgehog slice worthy of a birthday celebration.

The whole concept of this cake rested on a sliceable mousse dome, a sort of mousse I had never made before- previous mousses had always been the type to hide in a solid bowl or cup, no structural integrity needed!  Yet here I was aiming to make the majority of a cake with this mystical mousse. I do love to set myself a challenge. 
My internet research turned up few options that inspired confidence in the end result- I was after clean slices, not a puddle of mess on a plate. My holy grail was found with one of my go-to bloggers: Sprinkle Bakes. She is amazing and endlessly creative, everything I have made from her website has been perfect so it was with confidence I adapted the mousse portion of this recipe, making some substitutions and scaling down the recipe for the Nutella core. I also had to make substitutions in the hedgehog slice as Marie biscuits, the biscuit of choice for this slice in Australia, could not be found. Instead I used a combination of Nice and rich tea biscuits but any plain biscuit will do. Now, how to make this domed beauty!


RECIPE
*Note- this mousse cake should be started at least 48 hours in advance of serving*

EQUIPMENT
2 freezer safe bowls, one roughly a third smaller than the other. I used the smallest and largest of a 3 piece glass bowl set.
1 cake tin the same diameter of your large bowl, or slightly larger
Small and large saucepan

NUTELLA MOUSSE
Adapted from Sprinkle Bakes

3/4 tsp powdered gelatine
2 tsp cold water
1 egg yolk
2 tablespoons sugar
2 tablespoons hot milk
75g Nutella
½ cup whipping cream

HEDGEHOG SLICE
Recipe from Nine.com.au found here

300g plain biscuits (I used a mix of Nice and Rich tea)
1 cup chopped walnuts (optional)
½ cup desiccated coconut
250g butter, chopped
1 ¼ cups caster sugar
1/3 cup cocoa powder (I use Van Houten)
1 egg

COFFEE MOUSSE
Adapted from Sprinkle Bakes

2 tsp powdered gelatine
2 tablespoons cold water
3 egg yolks
½ cup sugar
½ cup of hot milk
225g white chocolate, chopped
1 ½ tablespoons instant coffee (I used Azeera)
1 ½ cups whipping cream

MIRROR GLAZE 
John Whaite recipe, found here

1 gelatine leaf
120g golden caster sugar
60ml water
1 tablespoon golden syrup
75g cocoa powder (I use Van Houten)
60ml single cream

METHOD

NUTELLA MOUSSE
1. Line the smallest bowl with plastic wrap, leaving an inch or so of overhang.
2. Place water in a small saucepan and sprinkle gelatine over the water, let stand for 1 minute.
3. Whisk in the egg and sugar, mixing well. Stir in the hot milk then place over medium heat, whisking constantly for 5 minutes or until it has thickened (it should coat the back of a spoon)
4. Stir in Nutella and mix until combined. Let cool.
5. Once cooled, whip the cream until stiff peaks form. Gently fold the gelatine mix into the cream until combined.
6. Pour into the small bowl. Cover with plastic wrap and place in the freezer until set (mine took at least 3 hours)

HEDGEHOG SLICE BASE 
Once the Nutella mousse is in the freezer make a start on the hedgehog slice.

1. Line a cake tin the same size as the base of your large bowl with baking paper.
2. Chop/crush biscuits into small pieces, place in a bowl along with the walnuts and coconut
3. In a medium saucepan combine the butter, sugar and cocoa powder. Stir over medium heat until the butter is melted and sugar is dissolved.
4. Remove saucepan from heat and whisk in egg.
5. Pour chocolate mixture over the biscuit mixture and mix well. Press into the prepared pan, the slice should be around 1 ½ to 2 cm deep. If yours looks to be getting taller than that you can put some of the mix in a separate tin to set separately and eat as a snack.
6. Cover and refrigerate until set (mine took around 4 hours. It wasn’t fully set but firm enough to cut and hold its shape).

COFFEE MOUSSE
Start to prepare the mousse once your hedgehog base is suitably set

1. Unwrap your hedgehog slice. If the slice is larger than your large bowl trim the slice to size so it fits snugly in the widest part of the bowl.
2.Line the large bowl with plastic wrap, leaving an inch or so of overhang.
3. Place water in a small saucepan and sprinkle gelatine over the water, let stand for 1 minute.
4. Whisk in the egg and sugar, mixing well. Stir in the hot milk then place over medium heat, whisking constantly for 7-10 minutes or until it has thickened (it should coat the back of a spoon)
5. Stir in white chocolate and instant coffee, mix until combined. Let cool.
6. Once cooled, whip the cream until stiff peaks form. Gently fold the gelatine mix into the cream until combined.
7. Fill the large bowl with around a third of the mix.
8. Remove the Nutella mousse from the freezer and unmould from the bowl, discarding the plastic wrap. Place the Nutella mousse into the coffee mousse with the flat side facing up. Pour the rest of the coffee mousse mix into the bowl or until almost full (leave enough room for the base to fit at the top of the bowl.)
9. Place your hedgehog slice on top of the coffee mousse (if one side of your slice is smoother than keep this facing up.
10. Fold the overhanging plastic wrap back over the base of the slice. Cover the bowl with plastic wrap and freeze for at least 24 hours.

MIRROR GLAZE.
1. Soak the gelatine in a bowl of cold water for 5 minutes
2. In a small saucepan heat the sugar, water and golden syrup. Allow to boil for a minute and then remove from heat and whisk in the cocoa powder. Once combined, whisk in the cream then return to medium heat for a minute, stirring constantly. Remove from the heat.
3. Remove the gelatine leaf from the water and squeeze to remove the excess water. Add to the chocolate glaze and stir until dissolved. Pass the glaze through a sieve into a bowl.

To use the glaze it needs to cool but still be pourable. You can either wait until it cools or place in the fridge until needed. On removing from the fridge microwave on short, low power bursts until pourable.

ASSEMBLY
.1. Set a wire rack over a tray.
2. Remove the cake from the freezer. Remove the plastic wrap from the bottom and invert the cake onto the wrack, peeling away the remaining plastic wrap.
3. With your glaze a pourable consistency, pour the glaze over the cake, letting the excess glaze drip down into the tray. If you need more glaze use the excess that has dripped into the tray.

CONFESSION NOTE: This was my first time using mirror glaze and I was terrified it would melt the mousse so didn’t warm it up as much as I should have- it was pourable but still quite thick. In the end it was too thick and stopped spreading before it fully reached the bottom of the cake which left a few bald patches. This meant there was a mad scramble as I scrapped excess from the tray and reheated before trying to apply to the side. Luckily gravity worked its magic and smoothed it all it so you couldn’t tell where the touch ups had been.

  4. Refrigerate until ready to serve. Mine was in the fridge for 24 hours before serving. You could serve it once the glaze has set but it may be frozen/semi-frozen (which is also delicious, though the hedgehog slice may be a bit solid!)


To serve I cobbled together some homemade truffles (dark chocolate, Kahlua and dark chocolate as well as white chocolate and coconut) adding them to the finished cake as decoration along with some Ferrero Rochers. 


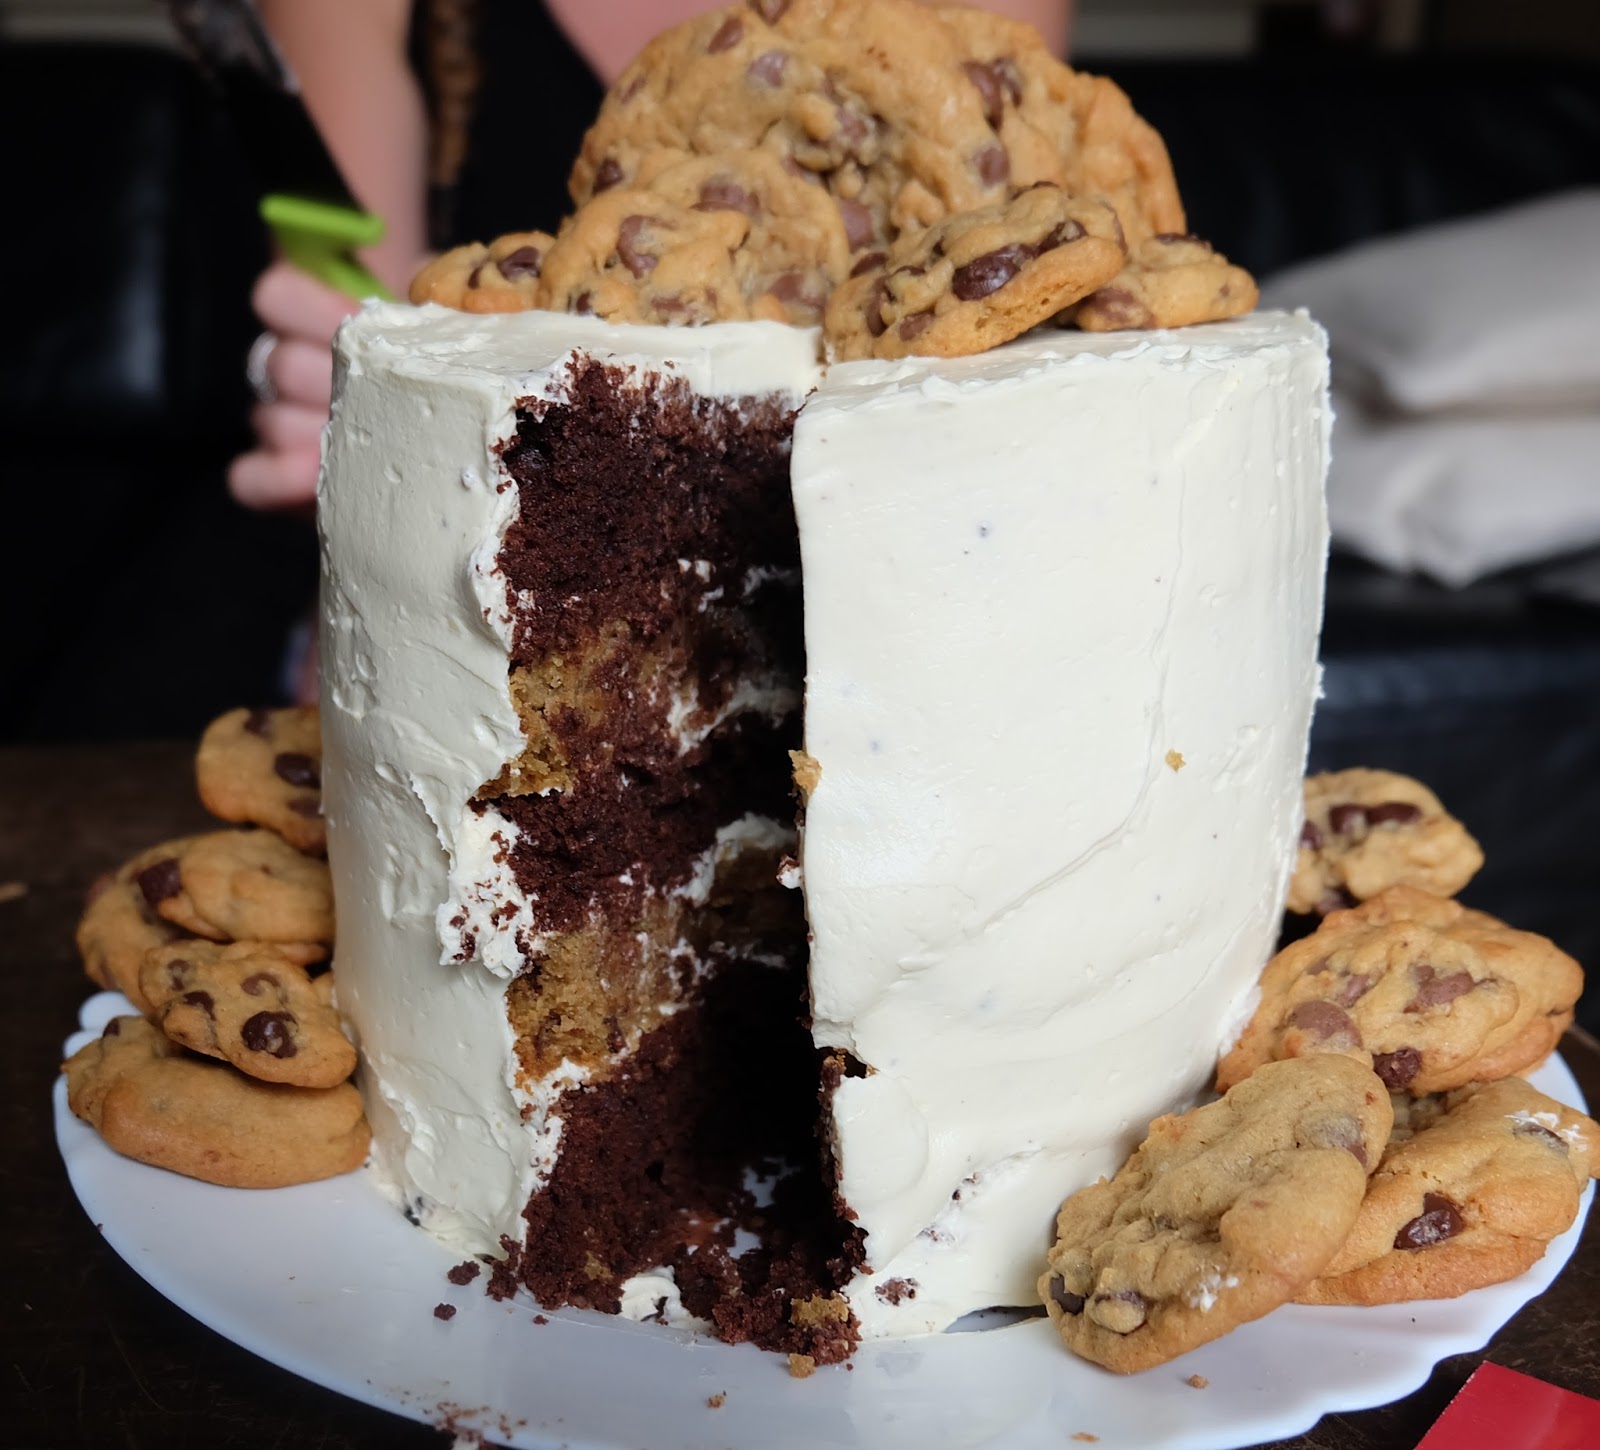
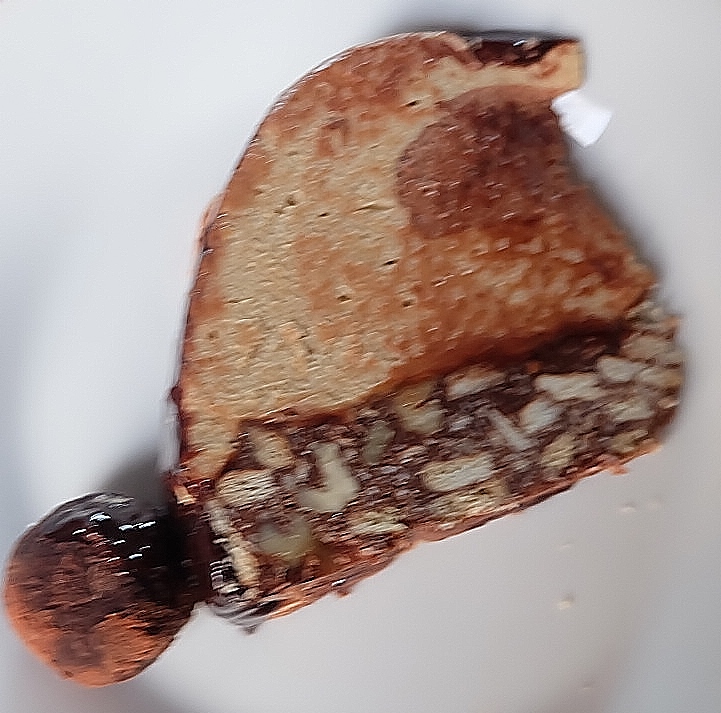
Blurry interior shot- too thankful it didn't collapse to focus!

Wednesday 30 March 2016

London Eats: Dickie Fitz

I am always wary when I hear a restaurant labelled as ‘Australian’.

As an Australian it causes both panic and curiosity. First of all, please let it not be somewhere serving overcooked ‘themed’ food (hello Outback Steakhouse, Walkabout…), second, how have they defined ‘Australian’ cuisine? Our national menu is so hard to quantify you’re never quite sure what to expect. Chicken parmigiana and a lamb chop? Steak and seafood? Stir fries, curries, dim sims, packets of Tim Tams, a meat pie?


Needless to say, curiosity was high when I heard Dickie Fitz was opening in Fitzrovia with an  Australian inspired menu. I scoured the internet in the weeks leading up to the opening, looking to see what would be on offer. What I found suitably satisfied my definition of Australian food, going for a contemporary take on what is a country with a vast mix of cuisines, solidifying the Australian feel with classics including barramundi, Asian fusion and a few very Aussie treats including Tim Tam martinis and lamingtons.


I headed in for lunch with my Aussie compatriot to taste test this new representative from our homeland. On the menu for us:

Looks can be deceiving! Truffle 'macancini'

A shared starter of Truffle ‘macancini’ (which seems to have since departed to only the Dinner menu) which were little nuggets of mac and cheese fried with a coating of black truffles. The truffle taste was spot on, not too overwhelming, but I could have upped the cheese taste (I love a cheesy mac ‘n’ cheese). They were just enough to get us going though, leaving lots of room for the dishes to follow.


Mine: The true Aussie classic- barramundi

Compatriot: Pork Belly & Fennel Kimchi


I opted for the Aussie classic, barramundi, for my main where Aussie No.2 went for the Pork Belly.  The fish dish was perfectly light yet delicious, with steamed fish,  grilled cabbage and perfect daikon served with a dashi broth. The compatriot's pork belly was perfectly cooked and just a little spicy, paired with fennel kimchi and a bacon broth. We both agreed these dishes caught the modern Aussie/Asian feel that’s so popular at home. For a bonus side we grabbed a side of the chicken salt chips, an Aussie classic, which were spot on with their flavour. Chicken salt is a thing everyone needs to get on board with.

We were of course tempted into trying out some of the Australian inspired cocktails on offer, getting a good giggle at the  Goon Bag Caipirinha, the U Beaut and the She’ll Be Apples though perhaps the Honey Badger should be called the Drop Bear? Our choices were swayed by the accompaniments- a Tim Tam Martini for the compatriot, and the Caramello Koala for me. Served with a Tim Tam and a Caramello Koala respectively (Australia’s best biscuit and a caramel filled koala shaped chocolate, for those not in the know) we couldn’t pass up the chance to indulge in a treat from home along with a lunch time drink.


Unsurprisingly they were both delicious although how much our opinion was influenced by our childlike glee I cannot say. Compatriot did as an any Aussie would and went with a Tim Tam Slam to get a start on her martini (vodka, espresso, Kahlua and honey syrup), while I greedily nibbled away at my koala while sipping my cocktail, a mix of Amaretto, Kahlua, Butterscotch Schnapps, Baileys, milk and cream. 

A true Aussie: Performing a Tim Tam Slam with her Tim Tam cocktail.

We bit the bullet and opted to finish off our visit with desserts to share. A chocolate fondant with salted peanut and burnt marshmallow and the banana bread sticky toffee with coconut and ginger. Both did not last long on the plates.


Dessert porn. Above, chocolate fondant. Below, banana bread sticky toffee pudding
At the end of our visit we were both happy to say this was an Australian inspired restaurant. The dining room itself carries pops of bright yellow that help to invoke the sunny motherland and the place on a whole is contemporary yet inviting. The price point is a little high for these two poor expats to make it a regular fixture but the breakfast menu looks delicious yet affordable and will likely be the focus of our next visit. Going forward it is comforting to know that I can get my hands on a Caramello Koala cocktail and some lamingtons when the craving hits, and that there’s a good restaurant to recommend when someone wants that fix of home.

Thursday 10 March 2016

Quick! Eat This: UK Edition

Quick! Eat This: UK Edition

A few quick picks from around the UK


Anything from Mary’s Milk Bar, Edinburgh

Mary is a sweetheart and everything she produces for her shop tastes like heaven. For a pick me up on a cold day opt for her hot chocolate float- hot chocolate with added ice cream- I recommend adding in a scoop of salted caramel

19 Grassmarket, Edinburgh EH1 2HS

Pork Roll from Oink!, Edinburgh

This place serves up a whole roast pig a day, opening from 11am to 5:30pm (5pm on Sundays) or until they sell out. Choices are easy- pick your size, your bread, add your pork, pick your accompaniment/sauce. I opt for the ‘Oink’ size with brown roll and haggis though to be honest you can’t go wrong with any option. Get in early if you want some crackling too. 

2 locations: 34 Victoria St, Old Town, Edinburgh EH1 2JW and  Royal Mile 82 Canongate Edinburgh EH8 8BZ

XXL Pressed Sandwich from Nic’s NYC Deli, Glasgow

Pulled pork, ham, roast chicken, pastrami, turkey, bacon, Monterey jack and Swiss cheese, jalapenos, pickles, sweet fried onion and choice of sauce. Need I say more?

4dh, 50 St Enoch Square, Glasgow G1 4DH

BBQ Pork Belly Buns at Kurobuta, London

Close runner up is the miso glazed aubergine. Excuse me, I’m drooling. 

3 locations: 312 King's Rd, London SW3 5UH, 17-20 Kendal Street Marble Arch, London, W2 2AW, and at Harvey Nichol's 109-125 Knightsbridge, London SW1X 7RJ

Fudge from The Fudge House Edinburgh, Edinburgh

I’ll let you pick your own flavour, you can’t really go wrong. 

197 Canongate, Edinburgh, Midlothian EH8 8BN

Ice Cream from Scoop and Crumb, Brighton

Feel very lucky if they have the Swedish Ginger biscuit flavour on rotation while you’re there, it’s delicious. If you’re hungry or celebrating an occasion go for one of their sundaes- definitely a worthy treat! 

5-6 East St, Hove, Brighton, Sussex BN1 1HP


Sunday 6 December 2015

London Eats Le Bun

Last month I had the opportunity to check out Le Bun at the Zetter Hotel with my partner in crime (Note: 'opportunity' in this situation means anxiously fought for a booking on opening day)
.

Le Bun has been a firm favourite of house Red Headed Baker whenever checking out Street Feast at Dalston. Hearing that they were popping up again this year at the Zetter, we had to make the pilgrimage north east to get our fix. 


The heart of Le Bun is American meets French (or vice versa) and the theme is definitely truffles. At their street stall our favourite dish is hands down the Truffle N Waffle, waffles with deep fried chicken and truffle butter. I have dreamt of this dish, it is that good. Unfortunately the Truffles N Waffles only makes an appearance on Le Buns weekend brunch menu at the Zetter which left us quite devastated but they turned out tempting options for dinner service too. 


The 'must have' Truffle Double Double.


We feasted on the Truffle Double Double, the steak frites, hot wings and the fries with truffle mayo.The wings were enormous and utterly delicious. Spicy like we like it, and messy as they should be. Once again, Le Bun does chicken well. More chicken please! The burger offered up the truffle taste we craved with truffle mayo lathered on top of two juicy beef patties, veal jam and cheese all served up in a brioche bun. 

Served along side the steak was the Le Bun steak sauce which my partner in crime dissected like a surgeon, trying to figure out every ingredient (can you solve the riddle Le Bun?) I preferred it on the frites, happily stealing truffle mayo from my fries to smear on my share of the steak. I think I drew some (amused) looks at my frites eating technique, straw fries don't lend themselves to cutlery so I adopted a more scoop and stuff method that proved successful. 

We left happy and almost full, hunting a sweet treat to finish our evening off as unfortunately there are no dessert options on the dinner menu. Le Bun is definitely one to check out and we're already planning our return, this time for brunch and our Truffles N Waffles fix!

Le Bun's residency at The Zetter lasts until the 20th of December. They are open for lunch and dinner Monday to Saturday 12 noon-10pm and for brunch on Saturday and Sunday from 11am-5pm. To book visit: http://www.thezetter.com/zetter-bar-and-lounge

Bonus- Le Bun has now popped up with their food van at Winter Wonderland in Hyde Park. They are serving a small selection of dishes including the Le Truffle Cheeseburger and the Truffle Double Double. The van is located near the Hyde Park Corner entrance, opposite the ice skating rink. A perfect location if you want your Le Bun fix but don't want to fight all the Winter Wonderland crowds.   

Friday 21 August 2015

It Begins with Cookies

Birthdays mean cake. Over the top cake. Not a teacake, or a loaf (as much as I love them) but an over the top cake that you can't whip up 'because it's Friday' or to serve with a cup of tea if guests pop around. My latest excuse to go a bit cake crazy was my lovely housemate Jen's birthday. 

My starting point was a request from the birthday girl for a brownie cake. She actually put in the request a good few months in advance after spotting a cake on Instagram. I promptly bookmarked the requested cake and then just as quickly proceeded to lose it. Uh oh. 

After remembering that the main element had been layers of brownies I decided to pull some other ideas together, building on the original theme and making a cake that she wasn't entirely expecting (who doesn't love birthday surprises!) and one that would make her smile. Birthdays are all about smiles!

Jenny is a fan of 'face cookies' as we call them in our house- giant ass cookies as big as our faces. Usually bought at local food markets, I thought I would chuck some face sized cookies inside her cake.
Brownie+cookies obviously equals this.


I present a five layer cookie and brownie cake with boiled milk icing. While it did take a bit of time to bring together, it wasn't very difficult and something that can be easily replicated. I made the cake and its components over 3 days but that was more due to a full calendar of birthday celebrations rather than necessity. Note: You will need to start the cookie dough at least 24 hours in advance. 

As always, most of my inspiration and recipes come from incorporating various  recipes and decoration ideas from the internet. I trawl blogs, Pinterest and Instagram for inspiration. The day Instagram allows you to search multiple hashtags will be a happy day indeed.

The brownie layer I found here and followed the recipe pretty much exactly. Due to a scheduled birthday viewing of Magic Mike XXL (highly recommended!)  I did  go off recipe and bake 2 layers in slightly larger pans as I only have one small pan (15cm/6inch) and had no time to wait for the first layer to cook, remove and repeat. Instead two layers were baked in 20cm/8 inch pans and then chopped down to the smaller size needed later- offcuts to snack on! (I mean, test samples to ensure quality control...) As always I find every oven is different so always keep an eye on your cakes. The larger, thinner layers were done after about 15-20 minutes while my small and deep layer took 40 minutes. 

For the cookies I wanted PERFECT cookies. My cookies are normally not what I would call perfect bakery cookies, flat and round and bumpy. Mine are normally domed and 'meh' looking. My hunt for the perfect cookie led me here and again, I bowed down to the experts and followed the recipe pretty much exactly. I subbed dark brown sugar for the light brown, as I only had dark to hand, and used a mix of both milk and dark choc chips as that's all the store had left- I bought them out of choc chips!

Half a kilo of choc chips chilling in a bowl. Awaiting destiny.

 Now, as previously mentioned, you do need to make this dough 24 hours before you intend to bake the cookies. I normally dismiss such instructions- I'm not known for my forethought- but in this case it is highly recommended. After a day in the fridge it was stiff as hell when I pulled it out, and my housemates enjoyed watching me attack the cookie cement with a spoon, but the dough loosened up quite quickly.

I used the dough to make two layers for the cake, scooping a 1/3rd of the mix into the smaller cake tin and baking until golden brown. The baking of both the cookie layers and cookies was done during our warm up party for the birthday evening so I can't remember precise baking times- I simply pulled the pan out when it started to turn light golden brown, with the edges beginning to go a deeper brown. I then let the layer rest until it cooled a bit, tipped it onto a wire rack and repeated for the second layer.

For the 'proper' cookies I quickly found that shoving dough into a 1/3 cup measuring cup and then dumping it onto the tray made for the perfect cookie once baked. I didn't bother with the whole straightening of the chips before baking thing as the recipe suggests as I did not have time, or care, for that and my cookies turned out pretty damn attractive. I also didn't squash them down as one test batch proved that the more attractive cookie were the ones unceremoniously dumped on the pan. I baked a few of the cookies at the 1/3 cup size and then did a mix of teaspoon and tablespoon sized batches, pulling them out when starting to go golden brown. This left me with a mix of sizes to decorate the exterior with. 

The icing was created the morning of serving the cake and triumphantly made with what I would call one of the world's worst hangovers. 2 days of drinking were catching up. Again, the internet provided my recipe- following this one
As well as the world's worst hangover I also have the world's worst stove. Despite constant stirring, the bottom of my pan is as hot as the core of the earth no matter what temperature I cook at so, by the time the mixture boiled there was a bottom layer of golden milk mix to contend with. I taste tested and luckily it didn't taste burnt, rather caramelised instead so I decided to keep the batch, trying to pour mostly the uncaramelised bits into a bowl for mixing. Some of the caramel did get in but I feel it only added to the flavour and once finished I couldn't see any brown flecks at all.

The whole she-bang. We don't really do 'neat' slices

The construction of the cake comprised of brownie, icing, cookie, repeat. Top with icing and the final brownie layer then coat in icing. You may get brownie crumbs in your icing. This is likely inevitable. Go past the mini meltdown you feel coming on and keep going. Say goodbye to visions of a crisp, pale exterior. It's delicious and no one will care except you.

Cut cookies, realise you have baked way more than needed and either hoard in a tin for yourself later or decorate around the cake in the hope that the guests eat them and rid you of the temptations. 

The cake was a success. We stuck some candles in it, sang happy birthday and stuffed ourselves with the delicious brownie,cookie, milk combination before dragging our tired, full bodies out to a birthday Sunday pub lunch (we have learnt- cake first, lunch second or everyone is too full for cake!)

We followed cake with this.


A Yorkshire pudding big enough to put my fist in. Yes, please. My face did not fit- I tried.

This was at the Latchmere in Battersea where I also discovered a British bar that knew how to make me a lemon, lime and bitters, so rare. 

Recipe

Ingredients

Brownie Layers

From the Domestic Gothess, makes 3 15cm/6inch cakes  or 1 15cm/6inch and 2 30cm/8inch of slightly varying heights
245g butter, cubed
245g chopped dark chocolate, chopped
115g (scant 1 cup) plain flour
55g (scant 1/2 cup) cocoa powder
4 large eggs
365g (1 + 3/4 cups) caster sugar

Cookie Layers  

From The Sisters Cafe, adapted from the NewYork Times
makes two 15cm/6inch layers and 30-40 cookies of various sizes. Note you can half the recipe and still have enough for the two layers and cookies to decorate the top

            2 cups minus 2 tablespoons (240g) cake/sponge flour (if available, if not use plain)
            1 2/3 cups (240g) bread flour (if available, if not use plain flour)
            1 1/4 teaspoons baking soda
            1 1/2 teaspoons baking powder
            1 1/2 teaspoons coarse salt
            284g (1 1/4 cups) butter
            1 1/4 cups (284g) dark brown sugar
            1 cup plus 2 tablespoons (226g) granulated sugar
            2 large eggs
            2 teaspoons natural vanilla extract
            500g milk or dark chocolate chips (or a mix)
            Sea salt

Boiled Milk Icing


enough to fill and ice a 5 layer 6 inch cake


4½ tablespoons all-purpose flour

240ml (1 cup) milk
200g (1 cup) granulated sugar
225g (1 cup) unsalted butter, at room temperature
1 teaspoon vanilla extract


Method
For the brownie layers


1. Melt chocolate and butter using one of the following methods.

Stove method: Place the butter and chocolate in a heat proof bowl over a pan of gently simmering water (don't allow the base of the bowl to touch the water) and stir until melted. Remove from the heat and set aside to cool to room temperature. 

Microwave method: Place the butter and chocolate in a microwave proof bowl and microwave for 30 second bursts on low power until melted, stirring after each 30 second period. Set aside to cool to room temperature. 

2. Preheat the oven to 180C/gas mark 4 and line the bases of three 15cm/6in round cake tins with greaseproof paper. (or in my case, one 15cm/6in and two 20cm/8in pans) 

3. Mix together the flour and cocoa powder. 

4. Place the eggs and sugar in a large bowl (or the bowl of your stand mixer) and whisk with an electric mixer until very pale and thick and at least doubled in volume. 

5. Pour the cooled chocolate into the egg mixture and fold in gently until almost combined. Sift in the flour and cocoa powder mixture and continue to fold in gently until there is no longer any dry flour, the mixture will be thick and fudgy. 

6. Divide the mixture between the tins and bake for 25-30 minutes (15-20 for 20cm/8in layers) until the centre no longer wobbles and a skewer comes out with moist crumbs but not wet batter on it. Keep a close eye on them as they can go from being under to over baked in a matter of minutes. 

7. Remove from the oven and leave to cool in the tins.  

 For the cookie layers and cookies


1. Sift flours, baking soda, baking powder and salt into a bowl. Set aside. (Don’t have a sifter? Stir well with a fork!)

2. Using a mixer on medium, cream butter and sugars together until very light, about 5 minutes. (Note: I have a very small bowl and cheap mixer, I recommend combining the sugar and butter with a spoon first before starting with the mixer to avoid a cloud of sugar. If you have trouble getting the mixture to cream add a little bit of the first egg to help bring it together)

3. Add eggs, one at a time, mixing well after each addition. Stir in the vanilla.


4. Reduce speed to low, add dry ingredients and mix until just combined, 5 to 10 seconds.


5. Stir in choc chips


6. Press plastic wrap against dough and refrigerate for 24 to 36 hours. Dough may be used in batches, and can be refrigerated for up to 72 hours.

To bake cookie layers

1. Preheat oven to 180 degrees C. Line your 6inch cake pan with baking paper.


2. Scoop 1/3 of the dough into the cake pan, pressing down. It will fill the cake pan to somewhere between 1/3rd and ½ of the way- either is fine.

3. Bake until edges are golden brown and top is light brown. Somewhere between 20-35 minutes (ovens vary), check after 15.

4. Remove from oven and cool in pan about 15 minutes, run a knife around the inside of the pan and gently tip cookie layer onto wire rack, removing baking paper, to cool. If it still looks too warm to tip out give it another 5 minutes to cool in the pan

5. Repeat for second layer

To bake cookies


1. Preheat oven to 180 degrees C. Line a baking tray with parchment/baking paper.

2. Scoop 1/3 cup mounds of dough onto baking tray

3. Sprinkle lightly with sea salt and bake until golden brown but still soft, 18 to 20 minutes.

4. Transfer tray to a wire rack for 10 minutes, then slip cookies onto another rack to cool a bit more.

5. Repeat with remaining dough, varying sizes (1 teaspoon mounds, 1 tablespoon mounds, ¼ cup) to get mixed sizes. Keep an eye on cookies as they cook as times will shorten for smaller cookies.

To make icing


1. Whisk together the flour, milk and sugar in a saucepan.

2. Gently heat over low heat, whisking continuously, until the mixture comes to a boil. Keep whisking and cook for about a minute then transfer to a mixing bowl.

3. Using a mixer, mix until the mixture cools to body temperature. Kepp mixing and add the butter, 1 tablespoon at a time, waiting until each is incorporated before adding the next tablespoon.

4. Once all the butter has been added, mix in the vanilla

5. The resulting icing should be smooth and thick. Use immediately or leave in a cool place until ready to assmble the cake.


To assemble


Trim down any larger sized brownie cakes to match the smallest one, if you used different size pans. 

Start with a bottom layer of brownie cake and spread a thin layer of icing over it. Repeat the process with a cookie layer, then brownie, then cookie, then brownie. 

Crumb coat the cake with a thin layer of icing, have a little break and pop it in the fridge for 10-15 minutes if you have room. Then ice with the remaining icing, it took me awhile to get it smooth enough that I was happy with. I used a butter knife, carefully angled so it doesn't get groove marks in the cake as that was all I had. 

Cut a selection of large and medium cookies in half and place, cut side down (obviously) on the cake, wherever you choose. Add some smaller cookies around the top and then arrange all the left over cookies you want to foist on your guests around the edge. Done!